DIY Cloth Baby Wipes
Posted: February 22, 2013 Filed under: Do It Yourself and Save, Frugal, Saving Money, Sewing | Tags: baby wipes, DIY, Frugal, saving money, Sewing 2 CommentsDIY baby wipes. So easy and will SAVE, SAVE, SAVE you money. I made these when I found out I was expecting and I’m glad I did because I like them better than disposables. They clean more efficiently and 8 million of them don’t come out of the dispenser when I want just ONE. (Have you ever tried to pull out JUST ONE disposable wipe?) I made about 50 wipes and it cost me a little less than $10. Here are the directions:
What you will need:
1) Flannel (I chose white because I didn’t want any dyes to bother my precious one’s bottom)
2) Thread
3) Sew Machine
Directions:
1) Buy the flannel from a fabric store (I found mine at Wal-Mart on sale).
2) Wash and DRY the material. This is very important as the fabric will shrink.
3) Cut into 8 inch by 8 inch squares.
4) Zig-zag the edges (or use a pretty stitch if you like!)
5) You are DONE!!
I looked up baby-wipe recipes, but decided to use plain water. I didn’t feel comfortable adding essential oils, soaps or etc to a mixture I was going to be using on my child. That being said, water works GREAT.
I’m so glad I made these, especially when I see Target advertising that their wipes are “only $4.56 per 256 count.” I’ll likely be able to use these wipes through the diapering of this child and my future one(s), too!
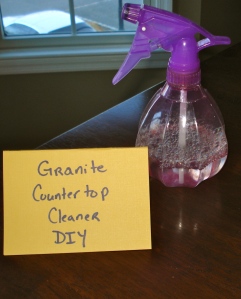
DIY Granite Countertop Cleaner
Posted: February 18, 2013 Filed under: Do It Yourself and Save, Frugal, Money Saving Recipes, Organize, Saving Money | Tags: Clean, DIY, Frugal, recipe, Save Money 1 CommentI love this cleaner. It works GREAT. It leaves no streaks. I also this on my mirrors, stainless steel and oven top. Make sure you test the product in an inconspicuous area before first use! I found this recipe here.
1/2 cup rubbing alcohol
2 cups water
8 drops dish soap (I have used Kirkland and Joy..both work fine)
Mix together and store in spray bottle for easy use! I love using this on my mirrors. It’s streak free when I wipe with an old newspaper. I LOVE this cleaner.
Easy Breakfast Recipe
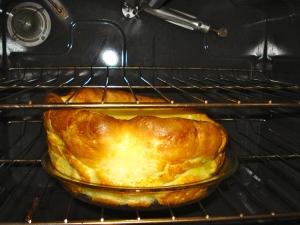
Posted: February 12, 2013 Filed under: Cooking, Frugal, Money Saving Recipes | Tags: baking, breakfast, Save Money, yummy 7 CommentsThis recipe is easy, cheap and delicious. I wouldn’t advise eating it every day, though. You might gain a few pounds! My mom used to make this when I was little and I loved watching the “pancake” rise.
Oven Pancakes
3 T butter
1/2 c milk
3 eggs
1/2 c flour
1 T sugar
1/4 tsp salt
Heat oven to 425 degrees F. Melt butter in 9 inch pie plate or round pan. Beat together eggs, milk, flour, sugar, and salt. Pour batter into hot butter. Bake for 20 minutes. Cut into wedges. Sprinkle with powdered sugar.
The Crock Pot is My New Best Friend
Posted: January 31, 2012 Filed under: Cooking, Frugal, Money Saving Recipes, Saving Money | Tags: beans, cooking, crock pot, Save Money, saving money, slow cooker, soup 10 CommentsI shared my exciting job news in my last post. While I’m ecstatic to finally be bringing home a pay check, I’m still committed to saving money. I do not want to start spending frivolously just because my husband and I will be making more. Thus, I’ve decided the Crock Pot is my new best friend. It cooks while I’m away, makes plenty of food for left-overs and does not require expensive ingredients! Perfect! This week I’m going to cook up some Festive Black Bean Soup. It looks super tasty, healthy and not to mention easy on the wallet. Take a peek!
Hired…
Posted: January 29, 2012 Filed under: Frugal, Saving Money | Tags: Frugal, saving money, unemployment, work 9 CommentsI recently wrote about my unemployment frustrations. I’m happy to share that I was recently offered a full-time job and I accepted! This unemployment era (this is what I have nicknamed it) of my life has taught me a lot about saving money. I will continue to apply these principles to my life, but I’m sure I will look for CONVENIENT ways to cut down costs while working. Does anyone have any suggestions?! I’d love to hear them!
I Tried It: DIY Drawer Divider
Posted: January 23, 2012 Filed under: Do It Yourself and Save, Frugal, Organize, Saving Money | Tags: DIY, do-it-yourself, Frugal, Organize, Project, saving money 4 CommentsMy work out clothing has never been organized. It’s always bothered me. So, I tried Design Sponge’s DIY idea. I made my own dividers out of cardboard, except I didn’t measure because I don’t believe in using measuring tapes 🙂 Here are the directions, step by step:
1). Hold cardboard over drawer and estimate wear you need to slice it (or your can measure if you REALLY want to), by slitting it with an exacto knife. (Do this with all four pieces of cardboard)
2) Cut a slot into the tops of the cardboard that will serve as your base. Do the same to the cardboard that will help divide your drawers, except cut the slots into the bottoms of those.
3) Fit all the pieces together and organize your drawers!! Super easy!!

Slit cut with an exacto knife…believe me, it doesn’t have to be very exact!!
I would say this project was worth the effort! I even labeled the compartments when I finished. Now my husband can’t tell me he doesn’t know where my clothes go when we’re folding laundry!
Cost-$0
Money Saved-At least $10. I own a couple of drawer dividers that cost $12 for a pair.
I secretly dislike the lamp shades in my master bedroom. I know. This is a minor problem, but I think I may have found a solution. Pinterest. This site is CHALK-FULL of frugal yet creative ideas! Here are some other reasons I love this site:
1) There are inspirational ideas for EVERYTHING. Not only can I look up a pin on how to fix my drab lamp shades, I can learn how to organize the cans in my kitchen and make my own wall art.
2) There are so many DIY tutorial’s. (This is a frugal person’s dream!)
3) The site lead me to some other blogs I am in love with.
So, before you go buy a new lamp shade, light fixture, piece of art or etc…check out Pinterest. You may be able rig up something you like on your own and save a few benjamins while you are at it!
*I was not paid to write about Pinterest. I just tried their site and really like it!
Keep Your Kitchen Towels ON the Rack With this Tip
Posted: January 13, 2012 Filed under: Do It Yourself and Save, Frugal, Gadgets, Saving Money | Tags: DIY, Kitchen, Saving-Money, Tip 8 CommentsWe recently moved into a home with no towel racks in the kitchen. I used the bar on the oven door, but the towels constantly slipped off. It was driving me crazy! So, I thought of a solution! I clipped my towel into place with a clothes pin! Ta-Da! I’m so glad I thought of this, because I was thinking about buying a towel rack from Bed, Bath and Beyond. This is way cheaper and I don’t have to drill any holes in the wall!
Mini Kitchen Hamper
Posted: January 12, 2012 Filed under: Frugal, Gadgets | Tags: crazy, Frugal, organization, saving money 14 CommentsA few months ago, I quit using paper towels. Due to this fact, I started accumulating dirty rags at the bottom of my staircase. (My laundry room is upstairs and the kitchen is on the first level.) So, today I spent the rest of my Christmas gift money on this cute little magazine holder. I call it my mini kitchen hamper because that’s what I re-purposed it to be. It cost $16 at Target, which is probably what I used to spend at Costco for a large pack of paper towels. I like this mini-hamper WAY better and definitely don’t miss spending cash on paper just thrown in the trash. Do you think it’s crazy I don’t use paper towels, anymore? I know a lot of people do! Tell me what you think.
Decreasing Gas Bills…
Posted: January 12, 2012 Filed under: Frugal, Gadgets, Saving Money | Tags: laundry, laziness, saving money 4 CommentsRemember how I suggested hang drying clothes instead of drying them? 
Well, this last month laziness won over thriftiness and it showed on our monthly gas bill (we own a gas dryer). My husband opened the statement and stated,
“What? How did the gas price increase by $20?
I replied, “That has to be wrong! We were out of town for a week!”
We scrutinized the bill and realized that it was indeed correct! I remembered that throughout the past month I began throwing the clothes in the dryer instead of hanging them. I justified myself by saying,
“It can’t make that much of a difference.”
Well, now I know it does. $20 x 12=$240. Once again proof that the little things really add up.


